



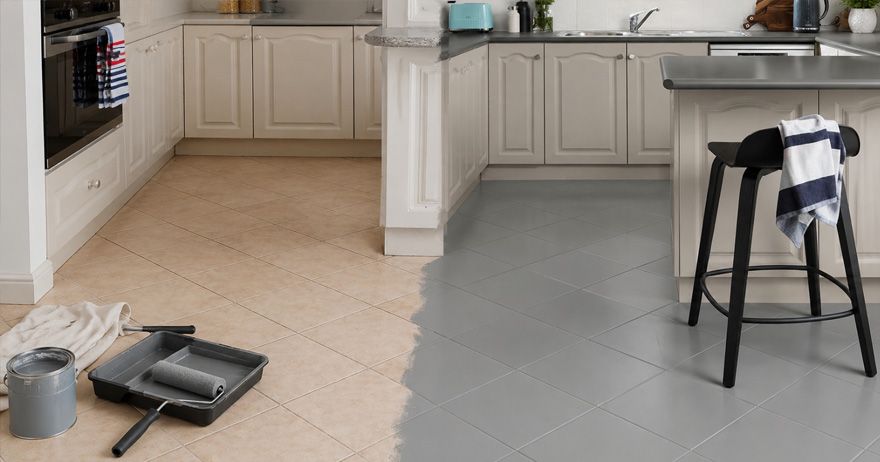
Learning how to paint floor tiles is an affordable way to refresh old or worn-out floors without replacing them. Whether you have ceramic, porcelain, or cement tiles, the right preparation, primer, and paint can transform your space while saving time and renovation costs. Painted floor tiles are especially popular in kitchens, bathrooms, balconies, and utility areas where a quick makeover can make a big visual impact.
In this guide, we'll walk you through the complete DIY process, recommend the best materials, share expert tips for a long-lasting finish, and highlight common mistakes to avoid. With proper preparation and quality materials, painted tiles can completely transform the appearance of a room while extending the life of existing flooring.
Can You Paint Floor Tiles?
Yes, floor tiles can be painted successfully, provided they are in good condition and prepared correctly. Ceramic, porcelain, cement, and quarry tiles are all suitable for painting when paired with the appropriate primer and floor paint. If the tiles are cracked, loose, or heavily damaged, repairs should be completed before beginning the project.
Painting works best for kitchens, bathrooms, laundry rooms, balconies, utility rooms and covered patios. A successful project starts with understanding how to paint floor tiles correctly and following each preparation step carefully.
Benefits of Painting Floor Tiles Instead of Replacing Them
Painting floor tiles has become a popular renovation solution because it offers impressive results without the high cost of replacement. Some of the major benefits include budget-friendly renovation option, faster than replacing tiles, minimal construction mess, wide range of colours and finishes, custom patterns and designs, extends the life of existing flooring and suitable for DIY projects.
A well-executed floor tile makeover can dramatically improve the appearance of kitchens, bathrooms, and balconies without requiring demolition. Many homeowners also explore creative tile paint ideas, such as geometric patterns, checkerboard finishes, faux stone effects, or decorative stencils to personalize their interiors.
Tools and Materials You'll Need
Before starting your project, gather all the required tools and materials to ensure a smooth painting process.
| Item | Purpose |
|---|---|
| Tile Cleaner or Degreaser | Removes dirt grease and stains |
| Sandpaper (180 to 220 grit) | Creates surface adhesion |
| Vacuum Cleaner | Removes sanding dust |
| Painter's Tape | Protects adjacent surfaces |
| Paint Roller | Covers large floor areas evenly |
| Angled Paint Brush | Paints edges and corners |
| Tile Primer | Improves paint adhesion |
| Floor Tile Paint | Provides a durable finish |
| Protective Gloves | Keeps hands clean |
| Microfiber Cloth | Final cleaning before painting |
Using the best paint for floor tiles along with a compatible primer significantly improves durability and reduces the risk of peeling. For homeowners attempting DIY floor tile painting, investing in quality materials often produces better and longer-lasting results than choosing cheaper alternatives.
Img
How to Prepare Floor Tiles Before Painting
Preparation is the most important stage of the entire project. Even premium paint may fail if applied to a dirty or glossy surface. Follow these below preparation steps carefully.
Deep Clean the Floor
Remove all dirt, grease, soap residue, and stains using a tile cleaner or degreaser. Pay special attention to grout lines, as trapped dirt can affect paint adhesion.
Repair Damaged Tiles
Inspect the floor carefully. Repair cracks, chipped edges, or loose grout before painting.
Sand the Tile Surface
Lightly sand glossy tiles using fine-grit sandpaper. It creates a slightly rough surface that helps the primer bond more effectively. This step is particularly important when painting ceramic tiles, as ceramic surfaces are naturally smooth and glossy.
Remove Dust
Vacuum the entire floor thoroughly and wipe it with a damp microfiber cloth. Allow the floor to dry completely before moving to the next stage.
Protect Adjacent Surfaces
Use painter's tape to cover skirting boards, walls, cabinets, and fixtures that shouldn't be painted. A properly prepared surface is the foundation of a successful tile painting guide, ensuring better adhesion and a more durable finish.
Step-by-Step Process to Paint Floor Tiles
Once the surface has been prepared, you are ready to begin painting. Try to follow these below steps for professional-looking results. Taking your time during each stage helps ensure an even finish and longer-lasting painted tile flooring.
Step 1: Apply the Primer
Use a roller for large areas and a brush for edges. Allow the primer to dry according to the manufacturer's instructions.
Step 2: Apply the First Coat
Roll the paint evenly across the floor using long, consistent strokes. Avoid applying thick coats, as they may lead to uneven drying.
Step 3: Let It Dry
Allow the first coat to dry completely before applying another layer. Drying times vary depending on the paint type and weather conditions.
Step 4: Apply the Second Coat
Apply a second thin coat for better colour coverage and durability. Some darker colours or patterned finishes may require a third coat.
Step 5: Allow Proper Curing
Although the paint may feel dry within a few hours, avoid heavy foot traffic until the paint has fully cured according to the manufacturer's recommendations.
Choosing the Best Paint and Primer for Floor Tiles
Selecting the right primer and paint is essential for achieving a durable finish. Floor tiles experience constant foot traffic, moisture, and cleaning, so using products specifically designed for floors delivers better long-term results. The table below compares the most commonly used options.
| Product | Best For | Advantages |
|---|---|---|
| Epoxy Floor Paint | High-traffic areas | Extremely durable and moisture-resistant |
| Acrylic Floor Paint | Low to medium traffic | Easy to apply and quick drying |
| Polyurethane Floor Paint | Kitchens and utility rooms | Excellent scratch and stain resistance |
| Tile Bonding Primer | Ceramic and porcelain tiles | Improves paint adhesion |
| Epoxy Primer | Heavy-use floors | Creates a strong foundation for paint |
When you paint floor tiles, always use a primer recommended by the paint manufacturer to ensure proper adhesion and long-lasting performance.
How to Seal and Maintain Painted Floor Tiles
Once the paint has fully cured, applying a protective sealer helps extend its lifespan by protecting it from scratches, stains, and moisture. Follow these below maintenance tips to keep your painted tiles looking fresh.
- Apply a Protective Sealer: Choose a clear polyurethane or epoxy sealer compatible with your paint.
- Allow Proper Curing Time: Avoid heavy furniture and frequent foot traffic until both the paint and sealer have fully cured.
- Clean Gently: Use a soft mop and mild floor cleaner instead of harsh chemicals that may damage the finish.
- Avoid Dragging Furniture: Use furniture pads beneath chairs and tables to minimize scratches.
- Repair Minor Chips Promptly: Touch up small damaged areas before moisture reaches the underlying surface.
Proper maintenance not only protects the finish but also reduces the need for frequent repainting.
Common Mistakes to Avoid When Painting Tiles
Avoid these below common mistakes to achieve professional-looking results.
- Skipping Surface Preparation: Dirt, grease, and glossy finishes prevent proper paint adhesion and may cause peeling.
- Using Ordinary Wall Paint: Wall paint isn't designed to withstand foot traffic. Always choose products formulated for floors.
- Applying Thick Coats: Thick paint layers take longer to cure and are more likely to chip or crack.
- Ignoring Drying and Curing Times: Walking on freshly painted tiles too soon can leave permanent marks and reduce durability.
- Not Using a Primer: Primer creates a strong bond between the tile surface and the paint, significantly improving longevity.
- Skipping the Protective Sealer: Without a topcoat, painted tiles are more vulnerable to scratches, stains, and moisture.
- Painting Damaged Tiles: Loose or cracked tiles should always be repaired before painting to ensure a smooth finish.
Is Painting Floor Tiles Worth It?
Painting tiles is an excellent option for many homeowners, but it is not suitable for every situation. The table below compares the advantages and limitations.
| Pros | Cons |
|---|---|
| Budget-friendly renovation | Requires careful preparation |
| Faster than replacing tiles | Needs curing time before use |
| Wide range of colours and finishes | May require touch-ups over time |
| Minimal construction mess | Not ideal for severely damaged tiles |
| Suitable for DIY projects | Heavy commercial areas may require more durable solutions |
If your tiles are structurally sound, painting them can be one of the most affordable tile renovation ideas for transforming your interiors. For homeowners seeking a quick home flooring makeover, painting offers an attractive alternative to complete floor replacement. Following how to paint floor tiles correctly ensures a finish that looks fresh, modern, and durable for years.
Final Thoughts
Painting floor tiles is an effective way to give old floors a completely new appearance without the expense and disruption of replacing them. Although the process requires patience, careful preparation, and adequate curing time, the results can dramatically improve your home's appearance while extending the life of existing flooring. If your tiles are in good condition and you are looking for an affordable renovation solution, how to paint floor tiles is a practical DIY project that delivers both aesthetic and financial benefits.