Also, identifying the exact source of leakage is the first step toward fixing the problem permanently. Depending on the cause, solutions may include crack sealing, waterproof coatings, plumbing repairs, or exterior wall treatment. In this guide, we explain how to stop wall leakage step by step and prevent future water damage effectively.
Common Causes of Water Leakage from Walls
Wall leakage is very common in India. And over time, these issues weaken the structural integrity of your house. So, here are some of the common causes of water leakage from walls:
- External water penetration
- Plumbing failures
- Roof damage
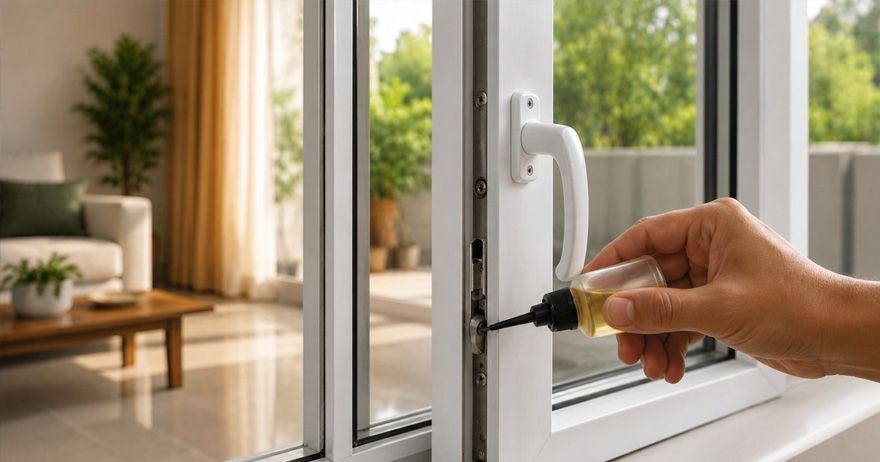
- Poorly sealed windows
- Failed damp-proof course (DPC)
- Poor site drainage
Signs of Water Seepage You Shouldn’t Ignore
Some of the common signs of water seepage that you should not ignore are:
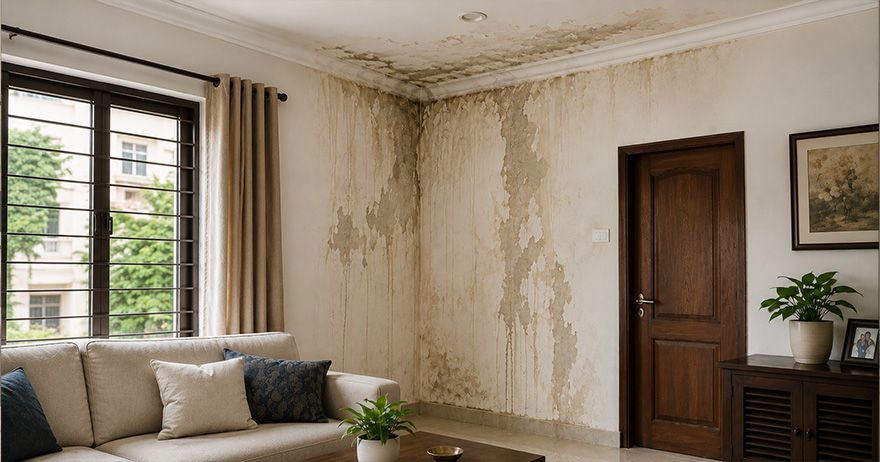
- Damp patches on walls
- Peeling paint
- Bubbling of plaster
- Discoloration on ceilings
- Cracked plaster
- Warped wooden fixtures
- Damaged electrical fittings
How to Identify the Source of Wall Leakage Causes?
To fix the wall leakage, first, you need to identify the source of the wall leakage. You should start by inspecting both internal wall water leakage and external areas of the building. Check for visible cracks, damp patches, peeling paint, or possible mold growth on the walls and ceiling of your house.
Also, don’t forget to inspect your windows and balconies for damaged sealants or gaps that may allow rainwater penetration. Another thing you must do is examine your plumbing lines and bathroom fittings for hidden leaks and moisture accumulation. You should also check for blockages in your roofs, gutters, and downspouts that might be causing water overflow that will eventually lead to wall leakage.
Step-by-Step Guide on How to Fix Wall Seepage
Here’s the step-by-step guide for fixing wall leakage:
Step 1: Identifying the exact source of seepage by inspecting walls, ceilings, windows, and plumbing lines for cracks, damp patches, or hidden leaks.
Step 2: Repair wall cracks and gaps using high-quality waterproof fillers like polyurethane sealants.
Step 3: Fix the plumbing leaks by replacing faulty pipes, broken fittings, and weak seals with new ones.
Step 4: Apply wall waterproofing methods like waterproof coatings, exterior wall leakage solution like sealants, chemical waterproofing treatments, and create a protective moisture-resistant barrier to improve the long-term durability.
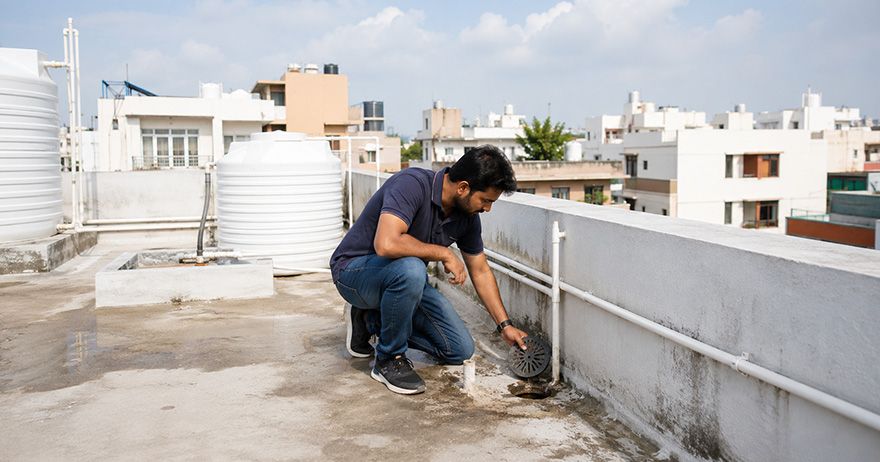
Step 5: Remove debris from your gutters and downspouts to ensure smooth rainwater flow. If there are any damaged roof flashing, tiles, and joints, just repair them to prevent rainwater from entering the walls and ceilings.
Step 6: Perform routine inspections and timely repairs for future safety.
Waterproofing Solutions for Interior & Exterior Walls
For interior walls, you need to use waterproof primers, anti-damp coatings, crack fillers, and chemical sealants to prevent moisture penetration and mold formation. You need to use interior waterproofing solutions for walls in areas such as your bathrooms, kitchens, and basements.
For your exterior walls, you can use elastomeric coatings, acrylic waterproof paints, weatherproof sealants, and membrane-based waterproofing systems as they provide long-lasting protection against rainwater and harsh environmental conditions. You must repair your wall cracks, seal joints, and maintain proper drainage systems to further enhance waterproofing efficiency.
How to Repair Cracks Causing Water Leakage?
Repairing cracks that cause water leakage begins with identifying the type and severity of the crack. So, follow these steps:
- Start by cleaning the affected area to remove loose plaster, dust, dirt, and moisture.
- If there are small hairline cracks, use waterproof crack fillers, acrylic sealants, or polyurethane compounds.
- If there are wider or structural cracks, you need to use epoxy injections or cement-based repair mortars to restore wall strength and durability.
- After repairing the cracks, apply a waterproof coating or exterior-grade sealant over the surface for added protection against rainwater and moisture.
- Then make sure you are doing regular inspection and maintenance to prevent future seepage problems.
Mistakes to Avoid During Wall Leakage Repair Tips?
There are some mistakes that you need to avoid while repairing your wall leakage:
- One of the most common mistakes is not identifying the actual source of seepage.
- Ignoring underlying issues.
- Using low-quality sealants, improper waterproofing materials, or temporary patchwork solutions.
- Never apply waterproof coatings on wet or unprepared surfaces.
- Never neglect your drainage systems, clogged gutters, and damaged joints.
- Don’t delay repairs it can worsen the issues.
Tips to Prevent Future Water Seepage Problems
Here are some tips that you must follow if you want to prevent future water seepage in your house:
1. Regular maintenance
The best tip to prevent future water seepage problems is regular maintenance. Even if you see a small water leakage patch, make sure you identify the actual cause and use protection.
2. Regular Inspection
Inspect your walls, roofs, windows, and plumbing systems regularly for possible cracks, leaks, or damp patches. These regular inspections can save you from future damage.
3. Clean Gutters & Downspouts
Ensure you keep your gutters and downspouts clean. This will allow proper rainwater drainage and prevent water overflow near walls, and won’t damage your walls.
4. High-quality waterproof coatings
While you are constructing your house make sure you are using weatherproof sealants, and durable construction materials of highest quality. Do proper site drainage and an effective damp-proof course (DPC) to prevent rising dampness and foundation-related seepage.
Final Thoughts: When to Call a Professional
You can handle basic and minor seepage with waterproofing treatments. But if the issue is persistent or severe, then you need to call a professional. Don’t ignore recurring damp patches, mold growth, structural cracks, peeling plaster, or hidden plumbing leaks, and it’s best that you consult a waterproofing expert. A professional can accurately identify the root cause of seepage and can recommend advanced waterproofing solutions for long-term protection of your walls and house.